|
|
Date: |
April
25th, 2001 |
| Type: |
Review |
| Supplier: |
CrystalFontz |
| Author: |
mayhem |
Final Notes:
"The LED backlight in the 634 consumes about 525mA at 5v,
which works out to about 2.6 watts. It is not zero, but it is not
very much load on a 250 to 300 watt power supply. Less than most
night lights actually. The lifetime of the LED backlight is rated
at 50000 to 100000 hours. That is a minimum of 5.7 years continuos
operation at full brightness" - Brent Crosby. Apparently
the LCDproc for Linux will turn the backlight on and off according
to the CPU load or such, but we didn't see this.
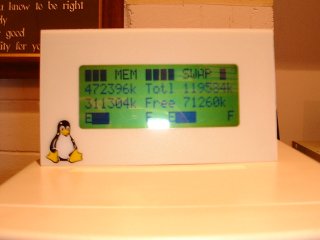
The above is
what the LCD looks like with the backlight turned off, its a bit
harder to read, but better to do so in the day to save power and
maximize the life of the LCD screen, especially when your not arround
I would turn it off.
If you want
to completely turn the LCD off then its no necessary to unplug it,
all you need to do is turn off the program and then the server,
this can be done by the following:
Linux:
You will firstly need to terminate the LCDproc program (you will
need to be root to do the shutdown of the LCD), to find out what
PID (PID = Process ID) the lcdproc, and LCDd for that matter, type
in ps at the console.
When you have the PID's then you must kill them one by one, firstly
the lcdproc and then the LCDd. To do this simply type kill
<pid>. When the server is down it should say "bye
bye bye" and the LCD will be turned off.
Win9x/NT/2k:
Simply either go to the command prompt again (this time type net
stop "NT LCDd") or in the Services list in Administrative
Tools you can stop the service.
Another thing
you might want to do in the Linux version of the sofware is turn
the 'LCDproc Server Info' screen off, for example when you only
want to display the Uptime and thats it. To do this you must use
the -i option and
tell it to be off, e.g. LCDd
-d CFontz -b on -i off.
Conclusion:
Well I must say that I am very happy with the result of this kit,
its easy to install and the effect is very cool. The mounting bracket
just makes the LCD fit in as if it was there when you bought the
computer and the little Tux graphic will makes it look even better.
Since the kit is
basically built there is no fiddly install and if you have no problems
with the software or any other part this should only take the best part
of 30 minutes, if that even, to setup. The
only thing that I must say the price is a little steep (especially since
the Aussie dollar is a bit low at the moment), most of us can't afford
it, but for those who can its a great buy.
Special thanks
to Brent Crosby and the people over at Crystalfontz
for supplying this kit for us to review. If you would like to purchase
one of these kits of some of the parts individually then you should
go to their website and checkout there range, recently they have
added many new products such as the Irman infrared remote and also
Irman infrared receiver.
As for the software,
LCDproc for Linux is awesome it does mostly what I want, but I think it
could use some network bandwidth stats, might ask or try and code that
myself. With the Windows version I must say that the output doesn't look
anywhere near as good as the original for Linux, its not bad, but could
do with a revamp.
Score:
8 / 10
FORUM: Talk
about this and other mods
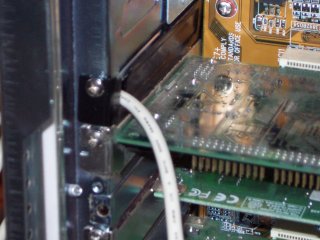
UPDATE:
In order to finish the installation of the LCD (mainly the serial
cable) properly we decided to cut a hole in a standard slot cover
at the back of the machine. By using a drill and a metal file we
made a hole/groove in the cover big enough so that the serial cable
would fit nicely without the risk of cutting it (you have to make
sure the cut is nice and smooth). The little cover proved to be
a bit of a pain to cut and we ended up scratching it, to fix this
we sprayed it with some black enamel spray paint. Once the cover
was ready we had to trim the plug of the serial cable so that it
would fit through the hole where the covers go, when it finally
fit through all that was left to do was screw the cover in place
with the serial cable through the hole.

|


